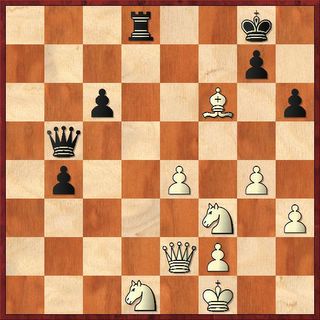
Brand New Day Cafe, 1.19.2006
Spanish: Exchange Variation [C69]
1.e4 e5 2.Nf3 Nc6 3.Bb5 a6 4.Bxc6 dxc6 5.0-0 f6 6.d4
This is the last book move.
6...Bd6
The book line continues with Bg4. Bd6 is an error that hangs a pawn if white knows the tactics of the position.
7.dxe5 fxe5 8.Bg5
This is where white misses an opportunity to win a pawn. The accurate line is 8. Nxe5 and if Bxe5, then 9. Qh5+ picking off the bishop on e5 next.
8...Nf6 9.Nc3 Bg4 10.Qd3 Qe7
I played this move with an eye toward castling queenside and having a potential discovered attack on the queen.
11.Qe3
I figured at this point I could pick up a tempo or two by harassing the white queen.
11...Bc5
Forcing the queen to make a 3rd consecutive move.
12.Qd3 Rd8
And now forcing a 4th consecutive queen move. The lesson here is to always develop with tempo when possible. Those are like free moves.
13.Qe2 0-0
Now black is slightly better since his pieces are all developed and he has a higher degree of activity.
14.h3
At this point I realize that the white rook on f1 and the queen on e2 are on the same diagonal. I now make a plan to try and arrange a skewer clong the a6-f1 diagonal.
14...Bh5 15.g4
White helps me out since I want to move this bishop to c4 via f7 anyway.
15...Bf7 16.Rad1 Rde8
This move is passive, but it avoids trades and forces white to come up with a plan. While white seems to control the d-file, there are no entry points for the rook. Furthermore, neither knight seems to have prospects of moving up the board.
17.a3 b5
White's queenside pawn move is enough of a diversion for me to play b5 giving the light squared knight a support point for the skewer I had been planning.
18.b4
This move threatens to win a bishop.
18...Bc4
However, you can often counter a threat by making a bigger threat, and this particular skewer threatens to slay the white queen.
19.Qd2 Bxf1
White has two equally good possibilities here. I realized that I could continue to leave the c5 bishop en prise because I was making bigger threats. Black's other possibility is Rd8 threatening the white queen once again. I decided to play this move after taking the rook.
20.Kxf1 Rd8
Another free move as the rook returns to the open file with a gain of tempo.
21.Qe2 Rxd1+ 22.Qxd1 Rd8
This is another gain of tempo, and notice that I continue to ignore the apparently hanging bishop on c5.
23.Qe2 Bd4
Finally, it is time to get the bishop to safety as I have no more ways to gain tempo available to me.
24.Nd1 c5??
This move is horrible and simply loses the bishop. I realized this almost as soon as I pressed my clock, and hope that Scott wouldn't see it.
25.c3 h6
Trying to delay the inevitable loss of my bishop and hoping that my opponent blunders again soon.
26.Bc1 Bxc3
I have to get something for the bishop, and it seems a pawn is all I can get. 27.Nxc3 c6
I though about playing cxb4, but I really didn't want the c3 knight to move up the board.
28.bxc5 Qxc5 29.Bb2 a5 30.Nd1 b4 31.axb4 axb4
After the exchange of pawns, black now has a degree of compensation for the piece. I have connected passed pawns on the queenside.
32.Bxe5
But this is at the expense of my e-pawn allowing my opponent a passed center pawn. 32...Qb5?
I need to have played Qc1 and get my passed pawns rolling. Instead I offer my opponent to go into an endgame. When I played this move I think I thought that after Qxb5 I win a piece with the intermezzo Rxd1+ followed by cxb5. However, after Rxd1+, white will surely play Ke2 threatening the black rook, and black will lose the rook and the game.
33.Bxf6??
Unbelieveable! White has played his exchanges in the wrong order. Now black will have a huge advantage in the endgame.

33...Rxd1+!
Obviously the knight was hanging, since the white queen cannot capture due to the pin.
34.Ne1 gxf6 35.Qxb5 cxb5
The doubled b-pawns are a small price to pay for the exchange advantage and a winning endgame.
36.Ke2 Rd4 37.Ke3 b3
Black gets away wih this move, since white has no way to stop the pawn from queening if he takes the rook.
38.Nd3 Rc4 39.Kd2 b4 40.f3 Rc2+ 41.Kd1 Rh2 42.Kc1
This move was forced. After b2, white would have had to sacrifice the knight to prevent the pawn from scoring a touchdown.
42...Rxh3 43.Nxb4 Rxf3 44.Kb2 Rf4 45.Nd5
Excellent play by white here. He attacks the black rook, and begs him to take either of the two pawns. If that happens, then white wins the game after Nxf6+, and then white picks up the black rook as well.
45...Rf3
Black sees the trap, and comes up with a new plan: guard the f6 pawn and then go after the g4 pawn creating a passer on the h-file.
46.Ka3 Kf7
Phase 1: the pawn on f6 is guarded.
47.Kb2 Rg3 48.Nc3 Rxg4
Phase 2: the pawn on g4 is captured creating the passed h pawn.
49.Kxb3 h5 50.Kc4 h4 51.Kd3?
Nd1 or Kd4 keep the game going, although there isn't much hope for white anyhow. 51...Rg3+ 52.Kd4 Rxc3 0-1

No comments:
Post a Comment